
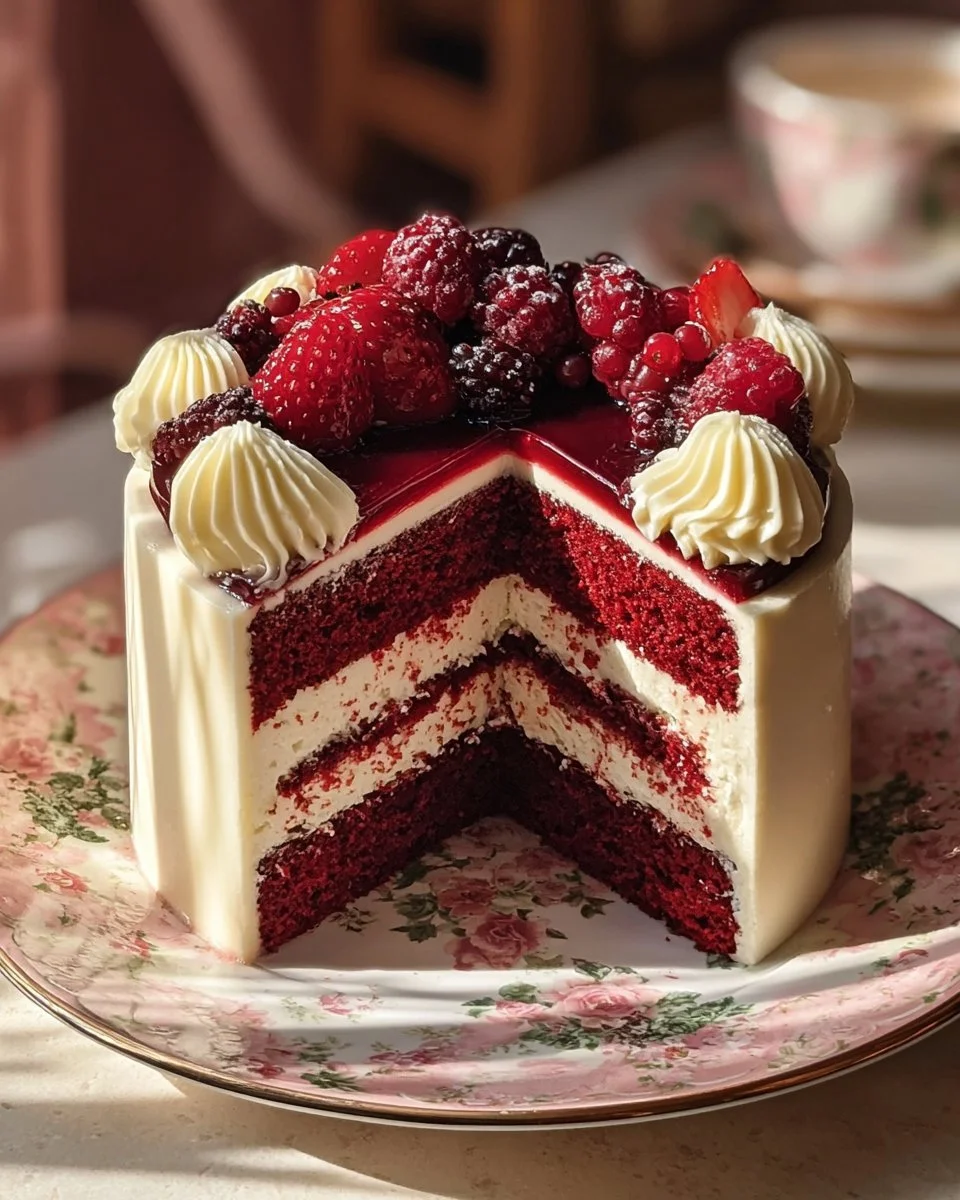
Red Velvet Cheesecake
Red Velvet Cheesecake is a delightful dessert that combines the rich flavors of red velvet cake with the creamy texture of cheesecake. This dessert offers the best of both worlds, making it a perfect choice for special occasions or just a sweet craving. The vibrant red color and velvety texture make it as pleasing to the eyes as it is to the taste buds.
Why Make This Recipe
Making Red Velvet Cheesecake is a fantastic way to impress friends and family. This show-stopping cake not only tastes delicious but also looks stunning on any dessert table. Its unique combination of flavors and textures will delight anyone who takes a slice. Plus, it’s a fun and rewarding baking project that allows you to explore different techniques, such as making a cheesecake layer and layering cakes.
How to Make Red Velvet Cheesecake
Creating this mouth-watering dessert involves several steps, but each one is simple and enjoyable. Follow these directions to master the art of making a Red Velvet Cheesecake.
Ingredients
For the Cheesecake Layer:
- 2 packages (8 oz each) cream cheese, softened
- 2/3 cup granulated sugar
- 2 large eggs
- 1/3 cup sour cream
- 1 tsp vanilla extract
For the Red Velvet Cake Layers:
- 2 1/2 cups all-purpose flour
- 1 1/2 cups granulated sugar
- 1 tsp baking soda
- 1 tsp cocoa powder
- 1/2 tsp salt
- 1 1/2 cups vegetable oil
- 1 cup buttermilk, at room temperature
- 2 large eggs
- 2 tsp vanilla extract
- 2 tbsp red food coloring
- 1 tsp white vinegar
For the Cream Cheese Frosting:
- 1 package (8 oz) cream cheese, softened
- 1/2 cup unsalted butter, softened
- 4 cups powdered sugar
- 1 tsp vanilla extract
Directions
Prepare the Cheesecake Layer: Preheat your oven to 325°F (160°C). Line a 9-inch springform pan with parchment paper and grease the sides. Beat cream cheese and sugar together until smooth and creamy. Add eggs one at a time, mixing well after each addition. Stir in sour cream and vanilla extract. Pour the batter into the prepared pan and bake for 40-45 minutes or until the center is set. Let it cool completely, then refrigerate for at least 2 hours.
Bake the Red Velvet Cake Layers: Preheat your oven to 350°F (175°C). Grease and flour two 9-inch round cake pans or line them with parchment paper. In a large bowl, sift together flour, sugar, baking soda, cocoa powder, and salt. In a separate bowl, whisk together oil, buttermilk, eggs, vanilla extract, and food coloring. Add the wet ingredients to the dry ingredients and mix until smooth. Stir in the white vinegar. Divide the batter evenly between the prepared pans and bake for 25-30 minutes or until a toothpick inserted into the center comes out clean. Let the cakes cool completely.
Make the Cream Cheese Frosting: Beat the cream cheese and butter together until smooth and fluffy. Gradually add powdered sugar, beating well after each addition. Stir in vanilla extract.
Assemble the Cake: Place one red velvet cake layer on a serving plate. Spread a thin layer of frosting on top. Place the chilled cheesecake layer on top, followed by another thin layer of frosting. Top with the second red velvet cake layer. Frost the entire cake with the cream cheese frosting, smoothing it out evenly.
Decorate and Serve: Decorate the cake with red velvet crumbs, chocolate shavings, or piped frosting swirls. Chill for at least 1 hour before serving for cleaner slices.
How to Serve Red Velvet Cheesecake
Serve the Red Velvet Cheesecake as a centerpiece dessert at parties or family gatherings. Pair it with a scoop of vanilla ice cream or a dollop of whipped cream for extra indulgence. Fresh berries, such as strawberries or raspberries, make a great garnish and add a fresh touch.
How to Store Red Velvet Cheesecake
Store Red Velvet Cheesecake in an airtight container in the refrigerator. It will stay fresh for up to 5 days. If you want to keep it longer, you can freeze slices in plastic wrap and then place them in a freezer bag. Thaw in the refrigerator before serving.
Tips to Make Red Velvet Cheesecake
- Make sure all ingredients are at room temperature for the best texture.
- Use quality food coloring to achieve a vibrant red color.
- Don’t skip chilling the cheesecake layer for the best results and cleaner slicing.
- To make it easier to frost, keep the cake layers and cheesecake chilled.
Variation
For a twist, you can add chocolate chips to the red velvet cake batter or swirl some chocolate ganache into the cheesecake layer for an even richer taste.
FAQs
Can I use a different type of frosting?
Yes! You can try using whipped cream or chocolate frosting if you prefer.Is there a way to make this cheesecake lighter?
You can use reduced-fat cream cheese and sour cream to lower the fat content while still enjoying the dessert.Can I bake this in advance?
Absolutely! You can bake the cheesecake layer and cake layers a day ahead and assemble them just before serving.
Red Velvet Cheesecake
- Total Time: 105 minutes
- Yield: 12 servings 1x
- Diet: Vegetarian
Description
A delightful dessert that combines the rich flavors of red velvet cake with the creamy texture of cheesecake, perfect for special occasions.
Ingredients
- For the Cheesecake Layer:
- 2 packages (8 oz each) cream cheese, softened
- 2/3 cup granulated sugar
- 2 large eggs
- 1/3 cup sour cream
- 1 tsp vanilla extract
- For the Red Velvet Cake Layers:
- 2 1/2 cups all-purpose flour
- 1 1/2 cups granulated sugar
- 1 tsp baking soda
- 1 tsp cocoa powder
- 1/2 tsp salt
- 1 1/2 cups vegetable oil
- 1 cup buttermilk, at room temperature
- 2 large eggs
- 2 tsp vanilla extract
- 2 tbsp red food coloring
- 1 tsp white vinegar
- For the Cream Cheese Frosting:
- 1 package (8 oz) cream cheese, softened
- 1/2 cup unsalted butter, softened
- 4 cups powdered sugar
- 1 tsp vanilla extract
Instructions
- Prepare the Cheesecake Layer: Preheat your oven to 325°F (160°C). Line a 9-inch springform pan with parchment paper and grease the sides. Beat cream cheese and sugar until smooth and creamy. Add eggs one at a time, mixing well. Stir in sour cream and vanilla extract. Pour the batter into the pan and bake for 40-45 minutes. Let it cool completely and refrigerate for at least 2 hours.
- Bake the Red Velvet Cake Layers: Preheat your oven to 350°F (175°C). Grease and flour two 9-inch round cake pans. In a bowl, sift together flour, sugar, baking soda, cocoa powder, and salt. In a separate bowl, whisk together oil, buttermilk, eggs, vanilla extract, and food coloring. Mix wet and dry ingredients until smooth. Stir in vinegar. Divide batter between pans and bake for 25-30 minutes. Cool completely.
- Make the Cream Cheese Frosting: Beat cream cheese and butter until smooth and fluffy. Gradually add powdered sugar, mixing well. Stir in vanilla extract.
- Assemble the Cake: Place one red velvet layer on a plate, spread a layer of frosting, add the cheesecake layer, another layer of frosting, then top with the second red velvet layer. Frost the entire cake with cream cheese frosting.
- Decorate and Serve: Decorate with red velvet crumbs or chocolate shavings. Chill for at least 1 hour before serving.
Notes
For best results, chill the cheesecake layer and ensure all ingredients are at room temperature.
- Prep Time: 30 minutes
- Cook Time: 75 minutes
- Category: Dessert
- Method: Baking
- Cuisine: American
Nutrition
- Serving Size: 1 slice
- Calories: 450
- Sugar: 34g
- Sodium: 300mg
- Fat: 24g
- Saturated Fat: 12g
- Unsaturated Fat: 10g
- Trans Fat: 0g
- Carbohydrates: 50g
- Fiber: 1g
- Protein: 6g
- Cholesterol: 80mg
Keywords: cheesecake, red velvet, dessert, baking, cream cheese, festive cake