
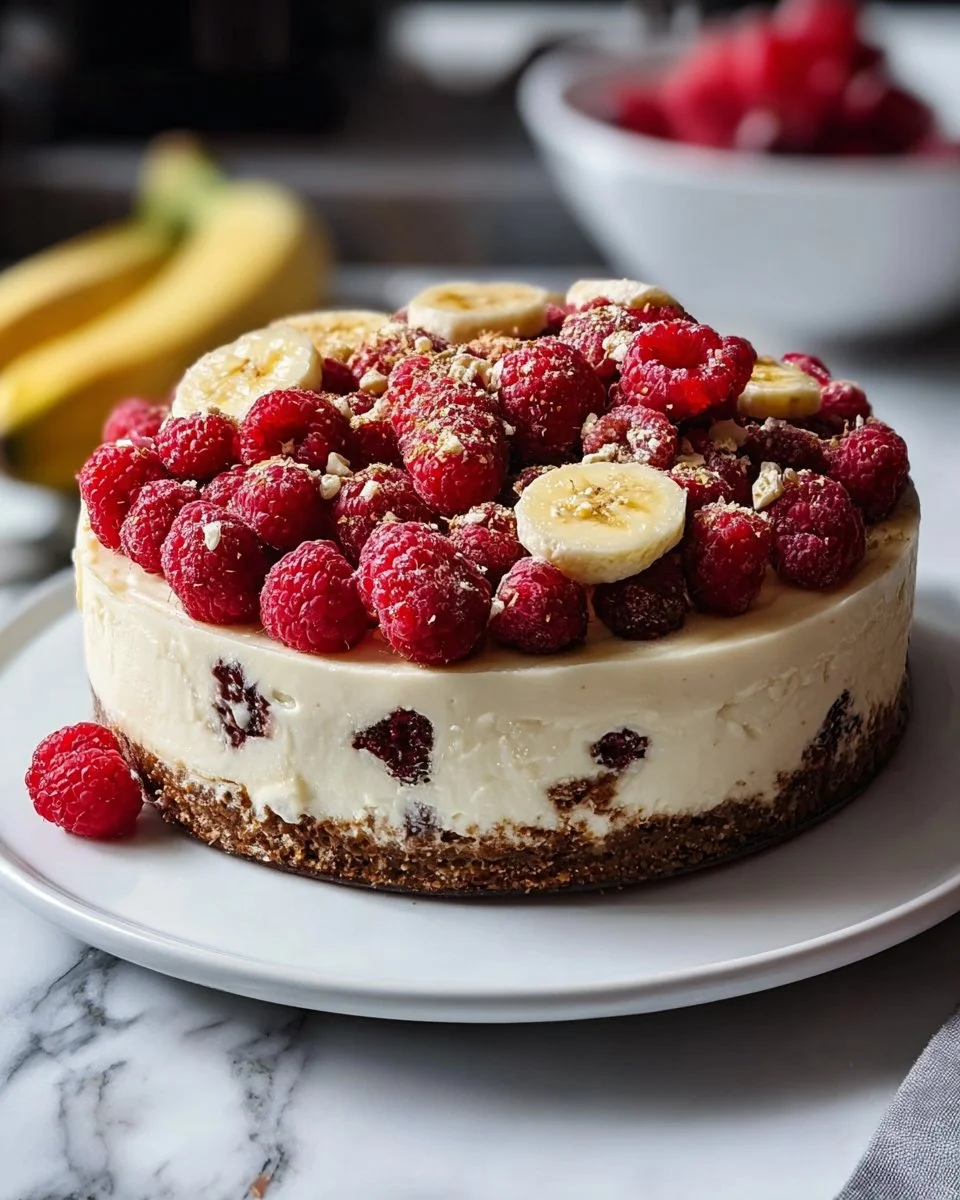
Heavenly No-Bake Banana Split Cheesecake
If you’re looking for a dessert that impresses without the fuss of baking, the Heavenly No-Bake Banana Split Cheesecake is just what you need. It’s creamy, fruity, and topped with delightful sauces, making it a favorite at gatherings and family dinners. This dessert is a twist on the classic banana split, blending all the delightful flavors into a cheesecake that’s as easy to make as it is to eat!
Why Make This Recipe
This No-Bake Banana Split Cheesecake is perfect for several reasons. First, it requires no baking, saving you time and kitchen cleanup. Second, it’s a crowd-pleaser that combines creamy cheesecake with the classic flavors of a banana split. Lastly, this dessert is adaptable, allowing you to customize it to your taste. It’s a delightful way to satisfy your sweet tooth!
How to Make Heavenly No-Bake Banana Split Cheesecake
Ingredients
- 1 1⁄2 cups graham cracker crumbs
- 1⁄4 cup granulated sugar
- 1⁄2 cup unsalted butter, melted
- 2 (8 oz) packages cream cheese, softened
- 1 cup powdered sugar
- 1 teaspoon vanilla extract
- 1 (8 oz) container whipped topping, thawed
- 2 bananas, sliced
- 1⁄2 cup crushed pineapple, drained
- 1⁄2 cup maraschino cherries, halved
- 1⁄4 cup chocolate syrup
- 1⁄4 cup caramel sauce
- Whipped cream
- Additional banana slices
- Maraschino cherries
- Chocolate pieces
Directions
Step 1: Prepare the Crust
In a medium bowl, combine graham cracker crumbs, granulated sugar, and melted butter. Mix until the crumbs look like wet sand. Press this mixture into the bottom of a 9×9-inch baking dish to form a crust. Set the crust aside while preparing the cheesecake filling.
Step 2: Make the Cheesecake Filling
In a large bowl, beat the softened cream cheese, powdered sugar, and vanilla extract until smooth. Gently fold in the whipped topping until the mixture is fluffy and light.
Step 3: Assemble the Cheesecake
Spread half of the cream cheese mixture over the graham cracker crust. Add a layer of banana slices, crushed pineapple, and halved maraschino cherries on top of the cream cheese layer. Finally, spread the remaining cream cheese mixture over the fruit layer, smoothing it out with a spatula.
Step 4: Add Toppings
Drizzle chocolate syrup and caramel sauce on top of the cheesecake to create an eye-catching design.
Step 5: Chill
Refrigerate the cheesecake for at least 4 hours until it’s set.
Step 6: Garnish and Serve
Before serving, add whipped cream, extra banana slices, maraschino cherries, and chocolate pieces on top for a special touch. Slice it up and enjoy your No-Bake Banana Split Cheesecake!
How to Serve Heavenly No-Bake Banana Split Cheesecake
Serve your cheesecake chilled, sliced into squares. You can enjoy it as is or add extra toppings like whipped cream and fruits for a festive touch. It’s great for parties or just as a sweet treat after a family meal.
How to Store Heavenly No-Bake Banana Split Cheesecake
Store any leftovers in an airtight container in the refrigerator. It will keep well for up to 3-4 days. Enjoy the flavors even after a few days!
Tips to Make Heavenly No-Bake Banana Split Cheesecake
- Make sure the cream cheese is at room temperature. This will help it blend smoothly.
- For added flavor, consider adding chopped nuts or coconut on top.
- If you like a bit of crunch, toast your graham cracker crust lightly before adding the filling.
Variation
You can easily change up this recipe by using different fruits such as strawberries or blueberries. Mix and match the toppings like using different syrups or adding chopped nuts.
FAQs
Q1: Can I use a different type of nut crust instead of graham crackers?
Yes! You can substitute graham crackers with crushed digestive biscuits or an almond crust.
Q2: How do I make this cheesecake sugar-free?
You can use sugar substitutes for granulated and powdered sugars. Make sure to check the conversions on the packaging for the best results.
Q3: Is it okay to freeze this cheesecake?
Yes, you can freeze it! Wrap it tightly in plastic wrap and then in aluminum foil. It can be frozen for up to 2 months. Thaw in the refrigerator before serving.
Heavenly No-Bake Banana Split Cheesecake
- Total Time: 240 minutes
- Yield: 8 servings 1x
- Diet: Vegetarian
Description
A creamy, no-bake cheesecake that combines the delightful flavors of a banana split, perfect for gatherings and family dinners.
Ingredients
- 1 1/2 cups graham cracker crumbs
- 1/4 cup granulated sugar
- 1/2 cup unsalted butter, melted
- 2 (8 oz) packages cream cheese, softened
- 1 cup powdered sugar
- 1 teaspoon vanilla extract
- 1 (8 oz) container whipped topping, thawed
- 2 bananas, sliced
- 1/2 cup crushed pineapple, drained
- 1/2 cup maraschino cherries, halved
- 1/4 cup chocolate syrup
- 1/4 cup caramel sauce
- Whipped cream (for garnish)
- Additional banana slices (for garnish)
- Maraschino cherries (for garnish)
- Chocolate pieces (for garnish)
Instructions
- Prepare the Crust: In a medium bowl, combine graham cracker crumbs, granulated sugar, and melted butter. Mix until the crumbs look like wet sand. Press this mixture into the bottom of a 9×9-inch baking dish to form a crust. Set aside.
- Make the Cheesecake Filling: In a large bowl, beat the softened cream cheese, powdered sugar, and vanilla extract until smooth. Gently fold in the whipped topping until fluffy.
- Assemble the Cheesecake: Spread half of the cream cheese mixture over the crust. Add a layer of banana slices, crushed pineapple, and halved maraschino cherries on top. Spread the remaining cream cheese mixture over the fruit layer.
- Add Toppings: Drizzle chocolate syrup and caramel sauce on top of the cheesecake.
- Chill: Refrigerate the cheesecake for at least 240 minutes until set.
- Garnish and Serve: Before serving, add whipped cream, extra banana slices, maraschino cherries, and chocolate pieces on top. Slice and enjoy!
Notes
Ensure cream cheese is at room temperature for smooth blending. Consider adding chopped nuts or coconut on top for extra flavor.
- Prep Time: 20 minutes
- Cook Time: 0 minutes
- Category: Dessert
- Method: No-Bake
- Cuisine: American
Nutrition
- Serving Size: 1 serving
- Calories: 380
- Sugar: 28g
- Sodium: 300mg
- Fat: 20g
- Saturated Fat: 10g
- Unsaturated Fat: 9g
- Trans Fat: 0g
- Carbohydrates: 45g
- Fiber: 1g
- Protein: 5g
- Cholesterol: 30mg
Keywords: cheesecake, no-bake, dessert, banana split, easy recipe