
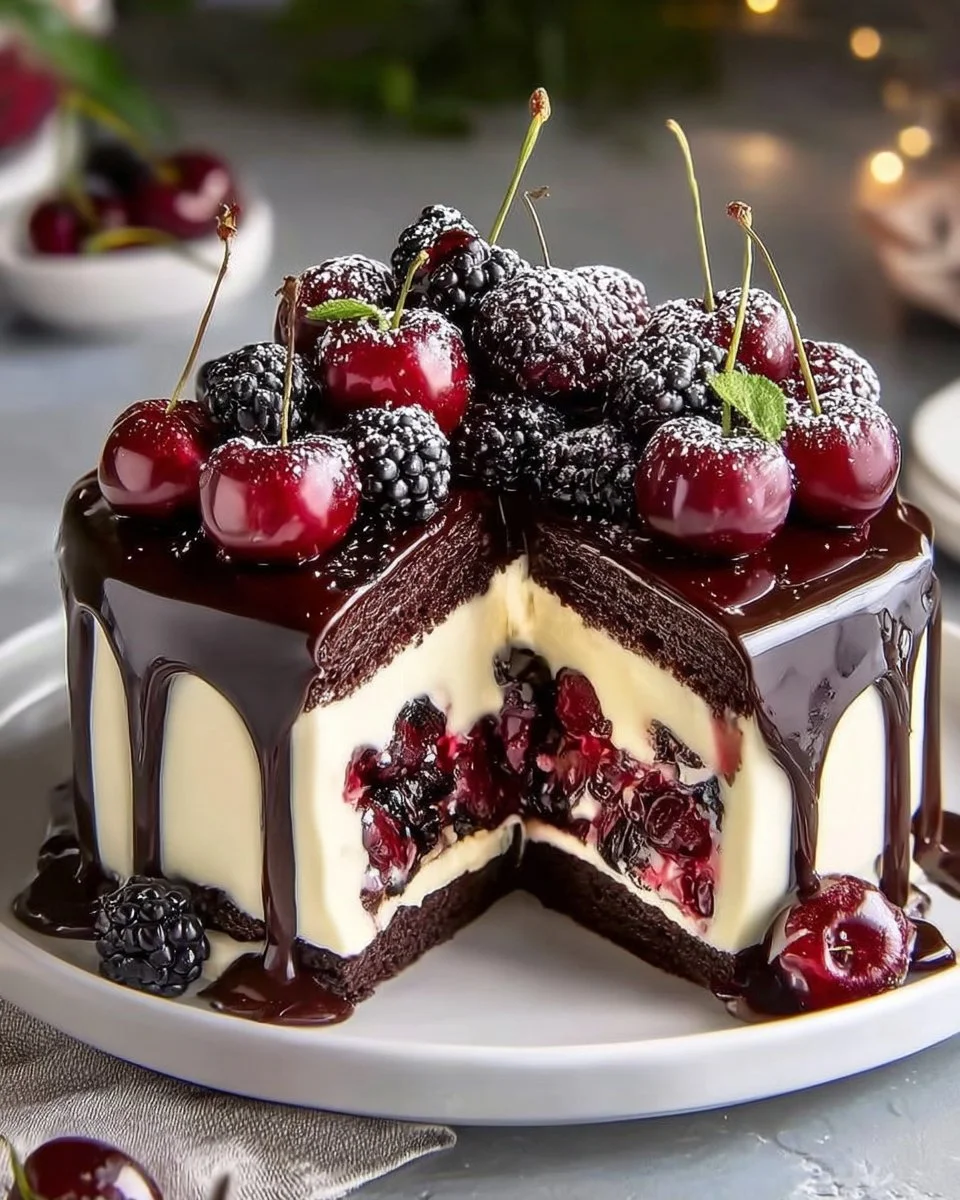
Black Forest Cheesecake Bliss
Are you craving something rich, creamy, and delicious? Look no further than the Black Forest Cheesecake Bliss! This delightful dessert combines the classic flavors of a Black Forest cake with the smooth texture of cheesecake. It features a chocolate cookie crust, creamy cheesecake filling, and a luscious cherry topping. It’s a dessert that’s sure to impress everyone at your next gathering.
Why Make This Recipe
The Black Forest Cheesecake Bliss is not just a treat for the taste buds; it’s also a feast for the eyes. This dessert is perfect for special occasions, parties, or just a sweet ending to your day. The combination of chocolate and cherries is a classic that everyone loves. Plus, it’s easy to make and can be prepared in advance, making it a stress-free choice for entertaining.
How to Make Black Forest Cheesecake Bliss
Ingredients:
- 2 cups chocolate cookie crumbs
- 1/2 cup unsalted butter, melted
- 16 oz cream cheese, softened
- 1 cup sugar
- 1 cup sour cream
- 3 large eggs
- 1 cup melted dark chocolate
- 1 tsp vanilla extract
- 2 cups pitted cherries (fresh or canned)
- 1/2 cup sugar
- 1 tbsp cornstarch
- 1/2 cup water
- 1 tbsp lemon juice
- Whipped cream (for topping)
- Chocolate shavings (for decoration)
- Extra cherries (for garnish)
Directions:
Prepare the Crust: Preheat your oven to 325°F (160°C). In a bowl, combine chocolate cookie crumbs and melted butter. Mix well and press into the bottom of a springform pan. Bake the crust for 10 minutes and let it cool completely.
Make the Cheesecake Batter: Beat cream cheese in a large bowl until smooth. Add sugar and mix until combined. Mix in sour cream, then add eggs one at a time, blending well after each addition. Stir in melted dark chocolate and vanilla extract until smooth and creamy.
Bake the Cheesecake: Pour the cheesecake batter over the cooled crust. Bake for 50–60 minutes, or until the center is just set. Turn off the oven and allow the cheesecake to cool inside for 1 hour to prevent cracks. Refrigerate the cheesecake for at least 4 hours or overnight.
Make the Cherry Filling: In a saucepan, combine cherries, sugar, cornstarch, water, and lemon juice. Cook over medium heat, stirring constantly, until the mixture thickens and coats the back of a spoon. Let it cool completely.
Assemble and Serve: Top the chilled cheesecake with the cherry filling. Decorate with dollops of whipped cream, chocolate shavings, and extra cherries.
How to Serve Black Forest Cheesecake Bliss
Serve the Black Forest Cheesecake Bliss chilled for the best taste. Slice it into generous pieces and top each slice with whipped cream and extra cherries if desired. This dessert is perfect for any gathering or a cozy family dinner.
How to Store Black Forest Cheesecake Bliss
To store the Black Forest Cheesecake Bliss, cover it tightly with plastic wrap or aluminum foil. Place it in the refrigerator where it will stay fresh for up to five days. You can also freeze it for longer storage. Just ensure it is well-wrapped to avoid freezer burn.
Tips to Make Black Forest Cheesecake Bliss
- Make sure your cream cheese is softened before mixing. This will help you achieve a smooth and creamy batter.
- Allow the cheesecake to cool slowly in the oven to prevent cracking on the surface.
- Use fresh cherries for the best flavor, but canned ones are a good option as well.
- For an even richer chocolate flavor, use high-quality dark chocolate.
Variation
You can add a splash of cherry liqueur to the cherry filling if you want an adult twist on this cheesecake. Alternatively, try adding a layer of chocolate ganache on top of the cheesecake before adding the cherry filling for extra indulgence.
FAQs
1. Can I use other types of fruit for the topping?
Yes, you can use other fruits like raspberries or strawberries. Just adjust the sugar in the filling if needed.
2. How long does it take to make this cheesecake?
The total time is about 7-8 hours, including cooling and refrigeration, so plan ahead!
3. Can I make this cheesecake in advance?
Absolutely! You can make it a day or two ahead of time and store it in the refrigerator until ready to serve.
4. Is this recipe suitable for gluten-free diets?
You can make it gluten-free by using gluten-free chocolate cookies for the crust.
Black Forest Cheesecake Bliss
- Total Time: 420 minutes
- Yield: 12 servings 1x
- Diet: Vegetarian
Description
A rich and creamy dessert combining the classic flavors of Black Forest cake with cheesecake, featuring a chocolate cookie crust topped with luscious cherries.
Ingredients
- 2 cups chocolate cookie crumbs
- 1/2 cup unsalted butter, melted
- 16 oz cream cheese, softened
- 1 cup sugar
- 1 cup sour cream
- 3 large eggs
- 1 cup melted dark chocolate
- 1 tsp vanilla extract
- 2 cups pitted cherries (fresh or canned)
- 1/2 cup sugar
- 1 tbsp cornstarch
- 1/2 cup water
- 1 tbsp lemon juice
- Whipped cream (for topping)
- Chocolate shavings (for decoration)
- Extra cherries (for garnish)
Instructions
- Preheat your oven to 325°F (160°C). In a bowl, combine chocolate cookie crumbs and melted butter. Mix well and press into the bottom of a springform pan. Bake the crust for 10 minutes and let it cool completely.
- Beat cream cheese in a large bowl until smooth. Add sugar and mix until combined. Mix in sour cream, then add eggs one at a time, blending well after each addition. Stir in melted dark chocolate and vanilla extract until smooth and creamy.
- Pour the cheesecake batter over the cooled crust. Bake for 50–60 minutes, or until the center is just set. Turn off the oven and allow the cheesecake to cool inside for 1 hour to prevent cracks. Refrigerate the cheesecake for at least 4 hours or overnight.
- In a saucepan, combine cherries, sugar, cornstarch, water, and lemon juice. Cook over medium heat, stirring constantly, until the mixture thickens and coats the back of a spoon. Let it cool completely.
- Top the chilled cheesecake with the cherry filling. Decorate with dollops of whipped cream, chocolate shavings, and extra cherries.
Notes
Ensure cream cheese is softened for a smooth batter. Allow the cheesecake to cool slowly to prevent cracks. Fresh cherries are recommended for best flavor.
- Prep Time: 30 minutes
- Cook Time: 60 minutes
- Category: Dessert
- Method: Baking
- Cuisine: German
Nutrition
- Serving Size: 1 serving
- Calories: 400
- Sugar: 28g
- Sodium: 300mg
- Fat: 24g
- Saturated Fat: 12g
- Unsaturated Fat: 8g
- Trans Fat: 0g
- Carbohydrates: 40g
- Fiber: 3g
- Protein: 6g
- Cholesterol: 60mg
Keywords: cheesecake, Black Forest, dessert, chocolate, cherries