

There’s something undeniably magical about biting into a warm, crisp croissant—each golden layer shatters like thin glass, revealing a soft, honeycombed center that melts in your mouth. But here’s the kicker: most store-bought croissants just don’t cut it. They’re often dense, bland, or worse—rubbery. That’s why this guide dives headfirst into the Perfect Homemade Croissant Recipe. We’re going beyond the basics to uncover secrets, troubleshoot mistakes, and walk through every buttery fold from start to finish.
This article breaks down the croissant-making journey into digestible parts, from picking the right ingredients to nailing the lamination process and avoiding rookie errors. With clear steps, practical tips, and answers to your burning questions, you’ll be well on your way to baking croissants that look and taste like they came out of a Parisian boulangerie—minus the airfare.
Why Make the Perfect Homemade Croissant Recipe?
The Irresistible Allure of Homemade Croissants
Picture this: the smell of buttery pastry wafting through your kitchen, a golden tray of freshly baked croissants cooling on the counter, and that first bite—flaky, tender, and rich. Making the Perfect Homemade Croissant Recipe at home isn’t just about taste; it’s an experience, a celebration of simple ingredients transformed into edible art.
Sure, croissants are available at most bakeries. But how often do they really deliver that light-as-air, buttery crunch? The truth is, very few can match the texture and flavor of croissants straight from your own oven. That’s why baking them at home has become a kind of delicious rite of passage for passionate home bakers.
Why Bakery-Quality Croissants Are Rare at Home
So what makes this pastry so elusive? It comes down to technique. Croissants are a type of French viennoiserie pastry made with laminated dough—thin layers of butter folded into yeast-leavened dough. This method takes time, patience, and a good deal of attention to detail. Miss a step, and you could end up with croissants that taste more like bread than the flakey dream you imagined.
Most store-bought versions cut corners by using margarine instead of real butter, rushing proofing times, or skipping essential folding stages. But when you commit to a Perfect Homemade Croissant Recipe, you’re embracing quality over convenience, flavor over speed.
Healthier, Customizable, and Rewarding
Beyond the obvious flavor upgrade, making croissants at home gives you control. You choose the ingredients—no artificial preservatives, and no sketchy fats. Want to use high-fat European butter? Go for it. Prefer organic flour? Absolutely. Plus, there’s a quiet satisfaction in watching dough rise, butter chill, and layers form under your hands. It’s an art and a science, and the result is pure joy.
And don’t worry—you don’t need a pastry degree. With this guide, loads of patience, and maybe a strong rolling pin, you’ll be crafting croissants that’ll wow your family and friends. Let’s roll!
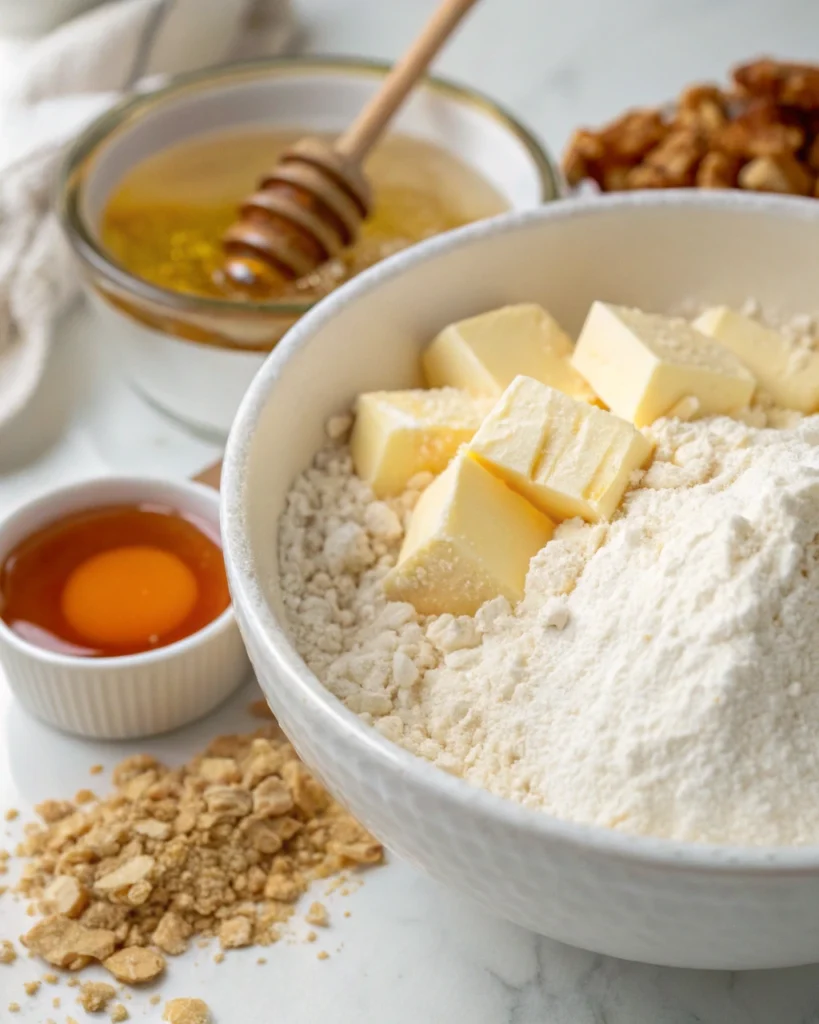
Key Ingredients for the Perfect Homemade Croissant Recipe
Flour Choice: Bread vs. All-Purpose for Structure
When it comes to croissants, flour isn’t just flour. Choosing the right kind sets the stage for those dreamy, airy layers. While all-purpose flour works well for many pastries, the Perfect Homemade Croissant Recipe really shines when you use flour with a bit more protein—like bread flour. Why? Because the extra gluten helps create that stretchy dough needed for lamination without tearing. On the other hand, if you prefer a slightly softer crumb, go with all-purpose. Both work, but bread flour gives your dough a little more strength when rolling and folding.
Keep in mind, flour brand matters too. Some all-purpose flours have higher protein content than others. Always check the label, and aim for something in the 11–12% protein range. This small choice can make a big difference in your finished layers.
Butter: Why European-Style Unsalted Butter Wins
If flour is the backbone, butter is the soul of croissants. And not just any butter—European-style butter with 82–84% butterfat content is the gold standard. It’s softer, richer, and more pliable, which makes it ideal for layering into your dough. The higher fat content creates those melt-in-your-mouth flakes, while the lower water content reduces the risk of soggy bottoms or leaky dough during baking.
Always go for unsalted butter. Salted versions can mess with dough hydration and are often too brittle. If you can’t find European butter, consider softening your regular butter and blending in a little flour (about 10%) to improve its flexibility before laminating.
Yeast, Milk, Water & Sugar Balance
Your dough’s rise and texture depend on more than flour and butter. Yeast plays a starring role, and in the Perfect Homemade Croissant Recipe, active dry yeast is preferred for its balanced rise. Just remember to bloom it first in warm liquid to activate it fully. A blend of milk and water gives the dough richness and softness without making it too heavy. For sweetness and structure, a mix of granulated sugar and honey or malt syrup is ideal—yeast loves feeding on the natural sugars to boost fermentation.
This ingredient balance ensures that every layer puffs beautifully and bakes to golden perfection. So, don’t skimp—each component here has a job to do.
Equipment & Prep Tools You’ll Need
Essential Tools: Rolling Pin, Ruler, Pastry Brush
Before diving into the Perfect Homemade Croissant Recipe, let’s talk gear. You don’t need a bakery full of tools, but a few key items make life easier. First up, a heavy-duty rolling pin. It helps flatten your dough evenly without breaking your back. If you’ve got a French-style pin (the tapered, handle-less kind), even better—it gives better control during delicate lamination.
Next, a steel ruler or measuring tape helps you cut consistent triangles and keeps your croissants uniform. And don’t forget a pastry brush—it’s your best friend when applying egg wash for that glossy, golden finish. Just be gentle when brushing those proofed croissants; they’re delicate little things!
Why a Kitchen Scale Matters for Precision
In baking, precision isn’t optional—it’s everything. That’s why a digital kitchen scale is non-negotiable for the perfect croissant. Measuring ingredients by weight ensures consistency every time you make the recipe. Cups and tablespoons vary too much, especially for flour and butter, which are key players in the croissant dough structure.
Even a small error in butter weight can throw off your lamination, and that means no flaky layers. So, invest in a scale—you’ll wonder how you ever baked without one. It’s the quiet hero behind every successful Perfect Homemade Croissant Recipe.
Step-by-Step Dough Preparation for the Perfect Homemade Croissant Recipe

Activating Yeast Properly for Fluffy Results
Let’s kick things off with the backbone of our croissant dough: yeast. For the Perfect Homemade Croissant Recipe, using active dry yeast works best. To wake it up, dissolve it in a mix of warm water and a spoonful of honey or sugar. The water should be around 105–110°F—just warm enough to activate but not hot enough to kill. Within 10 minutes, it’ll foam up like a latte. That’s when you know it’s alive and ready to raise the dough.
This step might seem small, but it’s crucial. If your yeast doesn’t bloom, your croissants won’t rise properly, and the layers will fall flat instead of puffing up into that dreamy, golden finish.
Mixing and Kneading the Dough
Once your yeast is ready, mix in the rest of the wet ingredients: lukewarm milk, a bit of melted butter, and the rest of your sugar. Slowly add in your flour and salt, then stir until a rough dough forms. From there, it’s time to knead. Kneading by hand takes about 5–7 minutes. You want a dough that’s smooth but not too elastic. Why? Because gluten develops further during folding, not now.
Don’t overthink it—if the dough feels soft and pulls together nicely, you’re on the right track. Wrap it up and let it rise until doubled. Typically, this takes about an hour in a warm kitchen. And just like that, you’ve built the foundation of a flawless croissant.
First Proof and Shaping the Dough Block
After proofing, gently flatten the dough to knock out air bubbles. Shape it into a rectangle, then wrap and chill it. This overnight rest makes the dough firm and ready for lamination. Cold dough is key—it makes folding easier and helps keep the butter layers distinct when we get to the magic of lamination.
Once you’ve nailed this base, you’re more than halfway to your first batch of buttery perfection.
Laminating the Dough for Flaky Layers
Making and Shaping the Butter Block (Tourrage)
Here’s where the real magic happens. To get those crispy, layered results in the Perfect Homemade Croissant Recipe, you need a perfect butter block—also known as tourrage. Use cold European-style unsalted butter and shape it into a thin, even rectangle. The best way? Place it between two sheets of parchment paper and bash it with your rolling pin until it’s about 5 x 6.5 inches and ¼ inch thick.
The butter should be cold but pliable—not rock solid, and definitely not melting. If it breaks when folded, it’s too cold. If it oozes, it’s too soft. Dialing in that balance is the secret to pro-level lamination.
Enclosing the Butter into the Dough
Once your dough and butter are both chilled to the right consistency, it’s time to combine them. Roll the dough into a rectangle about twice the size of your butter block. Place the butter in the center, fold the dough over like a letter, and seal the edges tightly. No butter should peek out—otherwise it’ll leak during baking and ruin your layers.
This step kicks off the lamination process. It’s delicate work, but once you get the hang of it, it’s oddly satisfying.
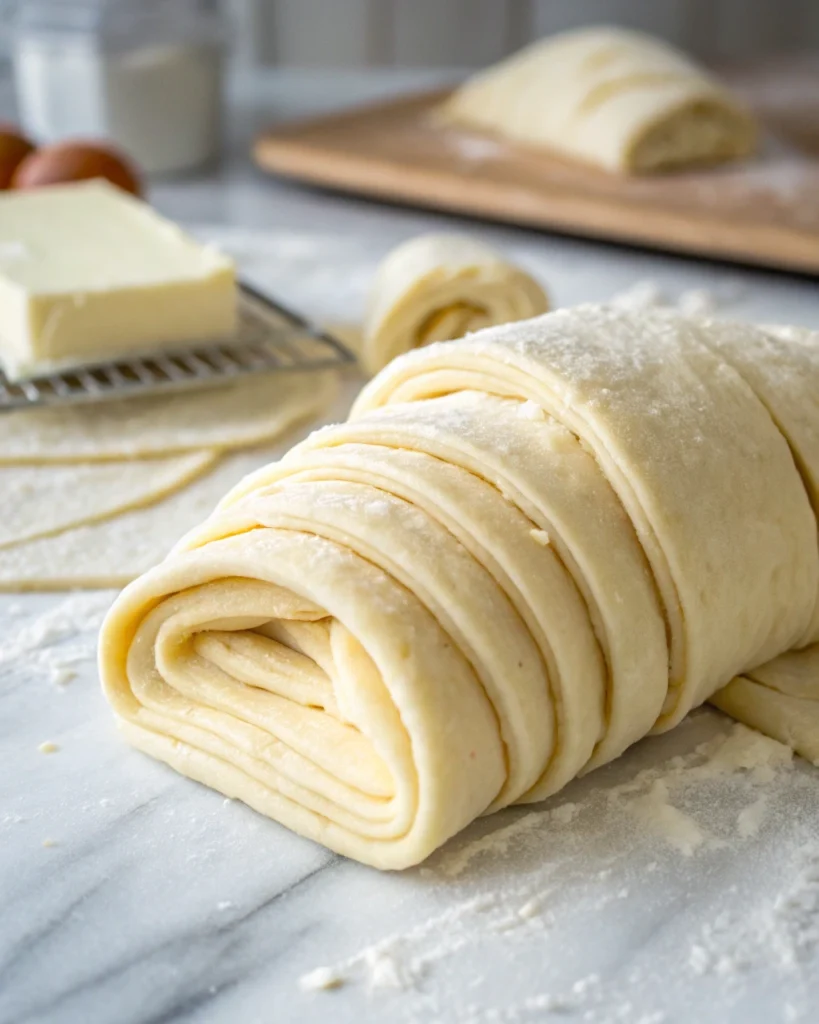
Double Fold vs. Single Fold Techniques
Now comes the rolling and folding. You’ll do two key folds: one double fold (also called a book fold), and one single fold. For the double fold, roll the dough into a long rectangle and fold both ends inward like a book, then fold in half. That’s four layers in one go!
Next, after chilling the dough again, roll it out and do a simple single fold—just fold one third over the center, then the other third on top. These two moves create 25+ layers of buttery, flaky croissant dough. Cool, right?
Need inspiration for what to make with the leftover dough scraps? Check out these puff pastry dessert ideas to turn extra trimmings into something delicious.
Cutting and Shaping the Croissants
Rolling the Dough to Sheet Thickness
Once your laminated dough is chilled and rested, it’s time to roll it out for shaping. This step in the Perfect Homemade Croissant Recipe is where precision really counts. Start by lightly flouring your surface. Then, roll the dough into a rectangle about 9 to 10 inches wide and roughly ¼ inch thick. Be gentle—too much pressure can squash the delicate layers you’ve worked so hard to build.
Work quickly, but don’t rush. If the dough begins to shrink or feel too warm, let it rest in the fridge for 10–15 minutes. Chilled dough is easier to shape and keeps the butter layers from smearing. Remember, flaky layers come from cool temperatures and careful handling.
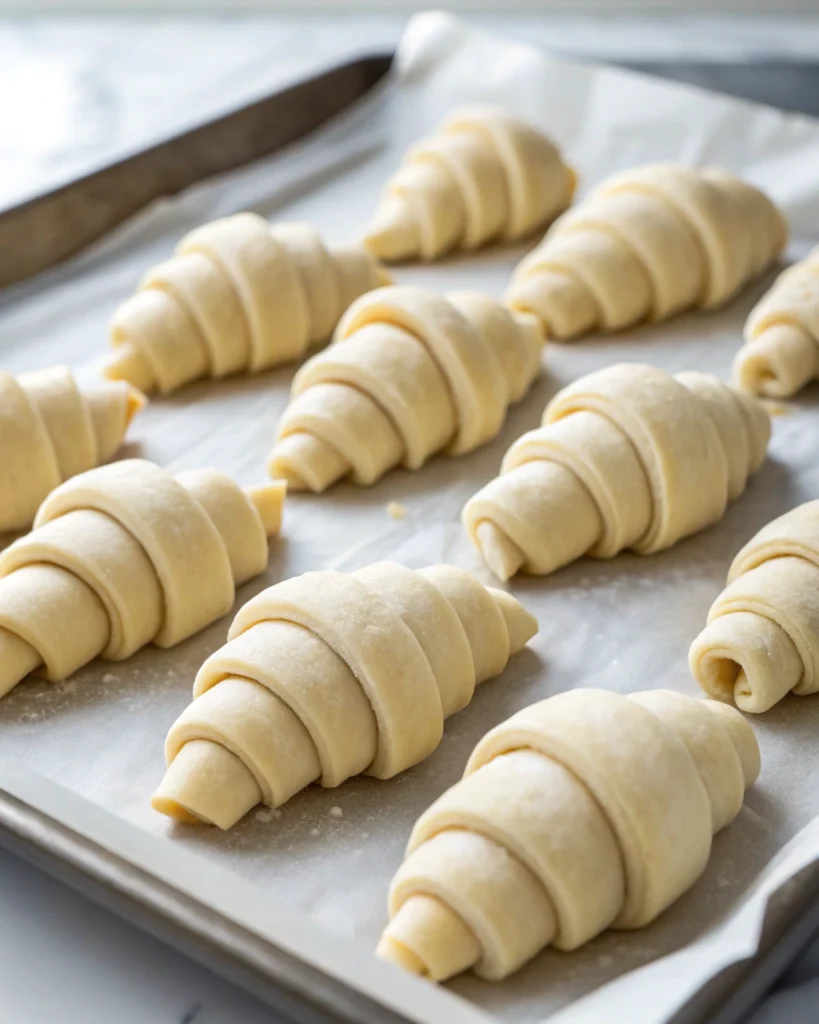
Measuring and Cutting Precise Triangles
Here comes the fun part—turning your dough into croissants! Use a ruler or measuring tape to mark the top and bottom of the rectangle. On one long edge, mark every 3.5 inches. On the opposite edge, mark the same, but offset the marks so they fall between the first set. Connect these points diagonally with a sharp knife or pizza cutter to create perfect triangles.
Each triangle should have a wide base and a tall point. If you want to get fancy, make a small notch in the base of each triangle before rolling—it helps give the croissant that signature crescent shape. Then, starting at the base, gently roll the dough toward the tip, keeping the roll snug but not tight. Place them tip-side down on a lined baking tray to hold their shape.
At this point, the croissants are shaped but not quite ready. Proofing and baking will bring them to life. But you’re nearly there—hang tight!
Proofing and Baking to Golden Perfection

Ideal Proofing Temperature and Duration
With your croissants rolled and resting on their trays, it’s time for their final rise. This stage in the Perfect Homemade Croissant Recipe is called proofing, and it’s crucial for developing volume and texture. Place the trays in a warm, draft-free spot—ideally around 75–80°F (24–27°C). Cover them loosely with plastic wrap or a damp towel to prevent drying.
Depending on your kitchen’s climate, proofing can take 2 to 3 hours. You’ll know they’re ready when the croissants have doubled in size and feel light and jiggly. A gentle wobble when you shake the tray means you’re on the right track!
Egg Wash Tips and Baking Temperature
Before they go into the oven, your croissants need a shiny coat. Whisk together one egg yolk with a tablespoon or two of milk, then brush it gently over each croissant using a soft pastry brush. Be extra careful—proofed croissants are fragile. Try not to press too hard or let egg wash drip between the layers, which can seal them shut and stop them from puffing.
Bake the croissants at 375°F (190°C) for 20–25 minutes. Rotate the tray halfway through to ensure even coloring. The result? Golden, puffed beauties with crisp edges and soft centers that flake apart in buttery ribbons. Trust us—it’s worth every minute of effort.
With proofing and baking done, you’ve officially completed the toughest part of the Perfect Homemade Croissant Recipe. All that’s left is to let them cool (just a bit!) and then enjoy every bite of your homemade masterpiece.
Storing and Reheating Croissants the Right Way

Freezing and Reheating Tips for Fresh Flavor
You’ve baked a tray full of flaky goodness—now what? If you’re not eating them all at once (though we wouldn’t blame you), it’s smart to store them the right way. Croissants are best enjoyed fresh, but you can absolutely keep extras tasting great. For short-term storage, place them in an airtight container at room temperature for up to two days. To keep them crisp, avoid the fridge—it dries them out quickly.
For longer storage, freeze them instead. Wrap each croissant in foil or parchment, then pop them in a zip-top bag. When ready to enjoy, reheat in the oven at 325°F (160°C) for 8–10 minutes. This brings back the crispy edges and soft, buttery center—almost like they just came out of the oven. Another pro tip? Don’t microwave them, as it turns your beautiful croissant into rubber. That’s a tragedy we can all avoid.
How Long They Stay Good at Room Temperature
Croissants made with care using the Perfect Homemade Croissant Recipe will stay tasty for about 24 to 48 hours at room temp. Just be sure to store them in a paper bag or breathable container to prevent sogginess. Want to crisp them up? Just pop them back in the oven for a few minutes, and you’ll revive that heavenly texture in no time.
And here’s a bonus: day-old croissants make great ingredients for other recipes, like croissant pudding or breakfast sandwiches. Nothing goes to waste!
Troubleshooting Common Croissant Mistakes

Butter Leaking Out? Here’s Why
We’ve all been there—opening the oven to find a pool of butter under your croissants. Yikes. But don’t panic. Butter leakage is one of the most common issues, especially for beginners. In most cases, it happens when the dough or butter was too warm during folding. That’s why every step in the Perfect Homemade Croissant Recipe stresses chilling between folds. When in doubt, chill it out.
Also, be sure to fully seal the butter block inside the dough before rolling. If the seal breaks, the butter escapes, and you lose that signature flake. Practice makes perfect—every batch teaches you something new.
Croissants Too Doughy or Flat? Fixes
Flat, dense croissants are a real letdown, especially after all that hard work. But don’t toss them just yet! If your croissants didn’t rise, a few things could be the culprit. First, check your yeast—was it active? If not, your dough won’t lift. Also, proofing matters. Rushing this step or skipping it altogether results in underwhelming layers.
Another common error is under-laminating or overworking the dough, which messes with the structure. So, take your time, let the dough rest, and follow the chilling steps closely. Mastering the Perfect Homemade Croissant Recipe is a journey, and each batch is a step closer to buttery bliss.
Expert Tips for Mastering the Perfect Homemade Croissant Recipe
Resting Periods Between Steps
If there’s one thing the Perfect Homemade Croissant Recipe demands, it’s patience. Resting the dough between folds isn’t just a suggestion—it’s non-negotiable. Every time you roll and fold, the dough becomes tighter due to gluten development. Without rest, it resists rolling, and worse, the butter might start to melt into the dough, ruining those distinct layers.
So, take a breather. Let the dough chill for at least 30 minutes between folds, and longer if your kitchen is warm. Not only will the butter stay cool and intact, but the dough will also relax and roll out more easily. It may seem like a lot of waiting, but this downtime is what transforms a good croissant into a great one.
When to Work Fast vs. When to Chill
Knowing when to move quickly and when to pause is key to mastering the Perfect Homemade Croissant Recipe. During lamination and shaping, you’ll want to work fast to keep everything cold. The longer the dough sits out, the more likely the butter will soften—and that’s a no-go. Quick, confident movements keep the structure intact and the layers sharp.
On the flip side, don’t rush proofing or chilling. Letting the dough rest allows the flavors to develop and the layers to hold. If you’re ever unsure, it’s safer to chill the dough than to push forward. Croissants may be delicate, but they reward those who move with both purpose and patience.
Remember, every step has its moment. Move quickly when rolling, pause often to chill, and most importantly—enjoy the process. Perfecting croissants isn’t just about the end result. It’s about learning a craft that’s equal parts art and science.
FAQs
What is the secret to a good croissant?
What is a common mistake in croissants?
What kind of flour is best for croissants?
Why are croissants so hard to make?
What is the rule for croissants?
How long to rest croissant dough before shaping?
Conclusion
Congratulations! You’ve tackled the layers, folds, and proofing steps that make the Perfect Homemade Croissant Recipe such a rewarding challenge. But more than just flaky pastry, you’ve created something with your own two hands. That’s no small feat.
Remember, croissant-making is a journey. Celebrate every win—even the imperfect ones. With practice, patience, and passion, your skills will rise just like your dough. The more you bake, the better you’ll get at creating flawless, bakery-style homemade French croissants. So roll up your sleeves, trust the process, and enjoy every buttery bite along the way.
Print
Perfect Homemade Croissant Recipe
- Total Time: 7 hours 30 minutes (including inactive time and resting)
- Yield: 6 croissants
Description
This Perfect Homemade Croissant Recipe teaches you how to make buttery, flaky, golden croissants right in your own kitchen. With step-by-step instructions and expert tips, you’ll master the art of lamination and create croissants that rival the best French bakeries.
Ingredients
– 250g all-purpose flour (or bread flour for stronger structure)
– 85g lukewarm milk (preferably whole)
– 60g lukewarm water
– 6g active dry yeast
– 5g honey or malt syrup
– 20g granulated sugar
– 25g unsalted butter (melted and cooled)
– 5g salt
– 140g unsalted European-style butter (for lamination)
Egg wash:
– 1 egg yolk
– 2 tbsp milk or cream
Instructions
1. Activate yeast in warm milk, water, and honey. Let it bloom until frothy (10 minutes).
2. Mix in melted butter, sugar, flour, and salt. Knead into a smooth dough.
3. Cover and let rise until doubled (about 1 hour). Flatten into a rectangle and chill overnight.
4. Prepare butter block by shaping cold butter into a 5×6.5 inch rectangle. Chill until firm but pliable.
5. Roll dough and enclose the butter block. Seal edges tightly.
6. Perform a double fold (book fold), rest dough in fridge for 30–60 minutes.
7. Perform a single fold, rest again for 30–60 minutes.
8. Roll dough into a large rectangle (about ¼ inch thick), then cut into triangles.
9. Roll each triangle into a croissant shape. Place tip-side down on lined baking tray.
10. Proof at room temperature until doubled (2–3 hours).
11. Brush gently with egg wash.
12. Bake at 375°F (190°C) for 20–25 minutes, or until golden and puffed.
13. Cool slightly before serving.
- Prep Time: 1 hour 30 minutes (plus overnight chilling)
- Cook Time: 25 minutes
- Category: Breakfast, Pastry
- Cuisine: French
Nutrition
- Calories: 376 kcal per croissant (approximate)
- Protein: 5g per croissant
Keywords: Perfect Homemade Croissant Recipe, flaky croissants, croissant dough, French pastry, homemade croissants, butter croissant recipe