
There’s something magical about biting into a warm, buttery, and flaky Danish pastry that practically melts on your tongue. But what if you could make that magic happen in your own kitchen? That’s exactly what this guide is all about.
We’re diving deep into the Perfect Danish Pastry Recipe — not just a list of steps, but a full experience. You’ll learn how to choose the right ingredients, handle laminated dough like a pro, shape your pastries beautifully, and avoid the most common mistakes. Whether you’re baking for a weekend brunch or just want to treat yourself, this recipe will walk you through every twist and fold.
Stick around to uncover the secrets to bakery-quality results at home — with layers that puff perfectly, fillings that stay put, and flavors that dance on your taste buds.
Introduction to the Perfect Danish Pastry Recipe
What Makes a Danish Pastry Truly Perfect?
Ah, Danish pastries — sweet, flaky, and downright irresistible. But what separates a decent one from the perfect one? It’s all in the layers. The Perfect Danish Pastry Recipe hinges on a precise blend of ingredients, careful dough lamination, and patience. Unlike puff pastry, Danish dough is leavened with yeast, which gives it that airy, croissant-like texture we all crave.
But beyond technique, it’s the balance of butteriness, sweetness, and that golden crunch that makes all the difference. A truly perfect pastry should puff evenly, flake like a dream, and leave you wishing for just one more bite.
Brief History of the Danish Pastry (Wienerbrød)
Despite its name, the Danish pastry actually hails from Vienna. The word “wienerbrød” literally means “Viennese bread.” Austrian bakers brought the technique to Denmark in the 19th century, and over time, it evolved into what we now recognize as the Danish pastry — a flaky, buttery marvel filled with custard, jam, or almond paste.
Today, Danish pastries are cherished across the globe, from Copenhagen cafés to breakfast tables in New York. They’re not just a treat — they’re a tradition.
Why This Guide Is Your Ultimate Resource for the Perfect Danish Pastry Recipe
Let’s be real: laminated dough can feel intimidating. Folding butter into dough without turning your kitchen into a greasy mess? Yeah, we’ve all been there. That’s why this guide breaks it all down into doable steps, packed with tips that actually work.
From ingredient swaps to proofing hacks, this walkthrough of the Perfect Danish Pastry Recipe leaves no crumb behind. Whether you’re a first-time baker or a seasoned dough-handler, you’ll find something here to elevate your pastry game.
Ready to roll? Let’s get baking!
Key Ingredients in a Perfect Danish Pastry Recipe
Butter, Flour, and Yeast – Choosing the Best for Flaky Results
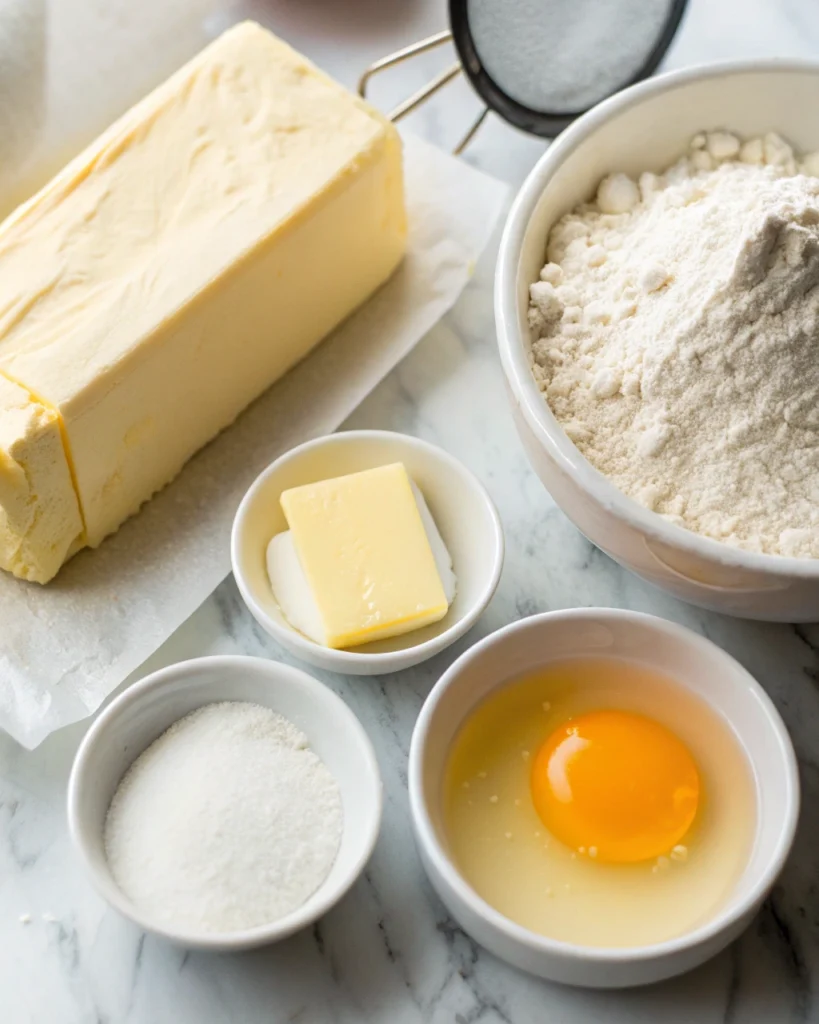
At the heart of every Perfect Danish Pastry Recipe lies a trio of essential ingredients: butter, flour, and yeast. But not just any kind will do.
Let’s talk butter first. You’ll want high-fat, unsalted European-style butter — around 82% butterfat. Why? It’s more pliable and less watery, which makes lamination easier and creates those gorgeous flaky layers.
Now, on to flour. Use all-purpose flour with moderate protein content (around 10-11%). This offers the right balance between structure and tenderness. Bread flour is too strong, while pastry flour may lack the strength needed for those airy layers.
And yeast? Active dry yeast works great, but instant yeast can save time and rise more reliably. Just be sure it’s fresh — old yeast leads to dense, sad dough.
To learn more about these ingredient basics, King Arthur Baking’s guide to laminated dough is a goldmine of info.
Supporting Ingredients: Sugar, Eggs, and Flavorings
But wait, there’s more! While the dough’s core ingredients build the structure, the supporting players create the flavor.
Sugar adds more than just sweetness — it feeds the yeast and helps that golden crust develop. Don’t go overboard though, or you’ll lose flakiness.
Eggs enrich the dough, giving it a softer texture and deeper color. They also help bind the ingredients, making the dough easier to work with.
Flavorings like vanilla, citrus zest, and a pinch of cardamom can bring subtle complexity. These small additions elevate your Perfect Danish Pastry Recipe from good to bakery-level fantastic.
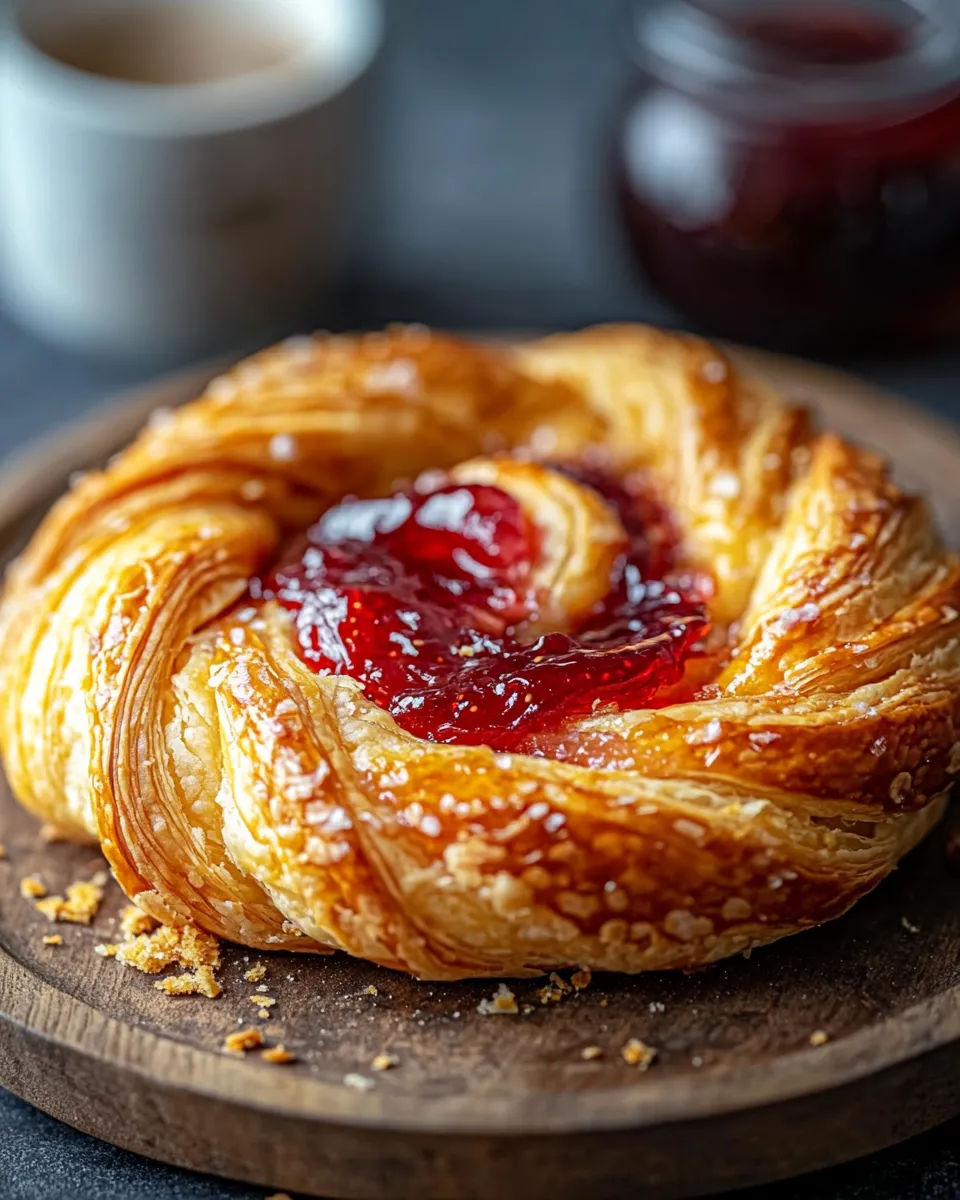
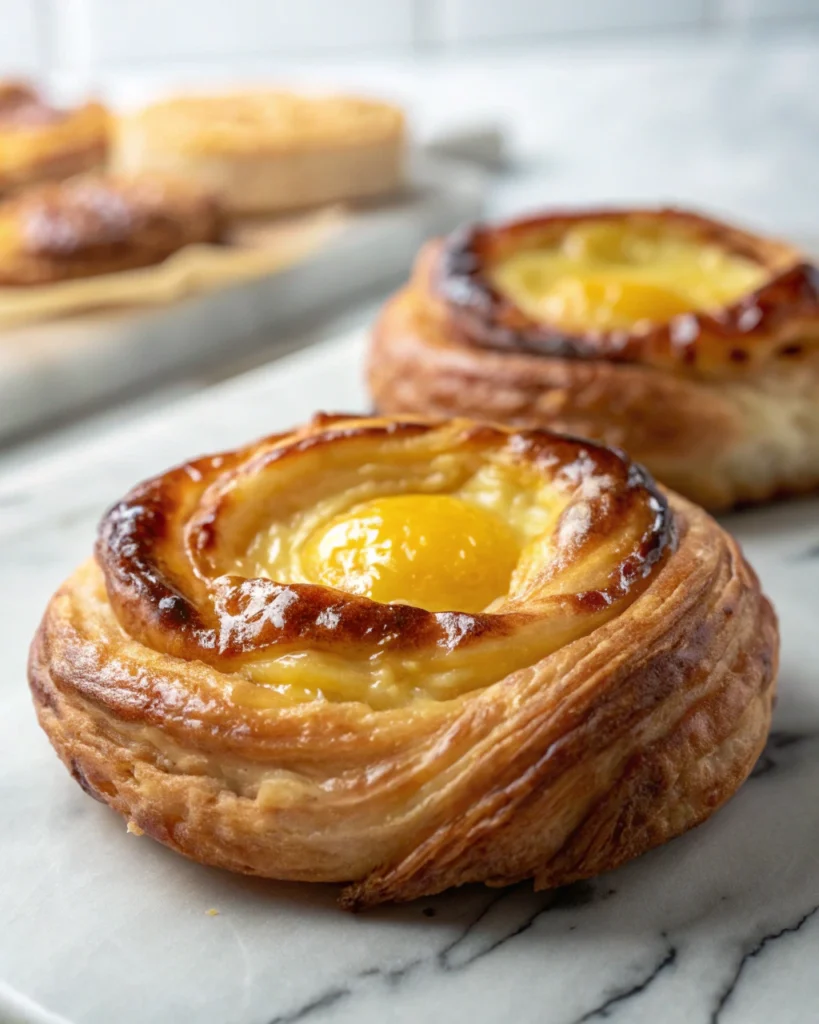
Optional Fillings: Custard, Jam, Marzipan – Natural and Flavorful Additions
When it comes to fillings, the sky’s the limit. Think custards, berry jams, almond paste, or even dark chocolate. Always use natural, high-quality fillings — no shortcuts here.
Custard (especially vanilla or cream cheese) is classic in pastries like Spandauer. Marzipan, on the other hand, adds a rich, nutty profile that plays beautifully with flaky dough.
Just remember: don’t overload! Too much filling can weigh down your pastry and make lamination pointless.
Step-by-Step Dough Preparation for Danish Pastry
Creating the Enriched Base Dough for Danish Pastry
First things first — making the dough base is where the journey begins. Unlike puff pastry, Danish pastry starts with a yeasted dough. This is what gives it its signature lift.
In a large bowl, mix warm milk, yeast, and a spoonful of sugar. Let it bubble for about 5–10 minutes until frothy. That’s your green light — the yeast is alive and kicking!
Next, whisk in eggs, the rest of the sugar, and a bit of salt. Gradually add flour and knead until a soft, smooth dough forms. You can do this by hand or with a mixer.
Let it rest for 30 minutes to 1 hour at room temperature. Or, if you’ve got time, pop it in the fridge overnight for a slower rise and deeper flavor.
Understanding Gluten Development for Structure
The gluten in flour forms a network that gives structure to your pastry. The key is kneading just enough — overdoing it makes the dough tough; under-kneading makes it collapse.
After mixing, perform a gentle stretch-and-fold every 15 minutes during the first hour of resting. This improves elasticity without overworking the dough. Your Perfect Danish Pastry Recipe should feel soft yet slightly springy.
You’ll know it’s ready when the dough passes the “windowpane test”: stretch a bit of dough — it should become translucent without tearing.
Resting and Chilling: Why Time Matters
Here’s the truth: great pastry takes time. After kneading, chill the dough before adding butter. Cold dough makes lamination easier and prevents the butter from melting.
Wrap it tightly and let it rest in the fridge for at least 1 hour. Overnight is even better. This step allows the gluten to relax and the flavor to deepen.
Skipping rest times or rushing through chilling is a shortcut to disappointment. If you want a flawless result, patience is non-negotiable.
In the next section, we’ll roll up our sleeves (literally) and get into lamination — the true heart of any Perfect Danish Pastry Recipe.
Lamination – The Signature Technique in a Perfect Danish Pastry Recipe
What Is Lamination and Why It’s Essential for Flakiness
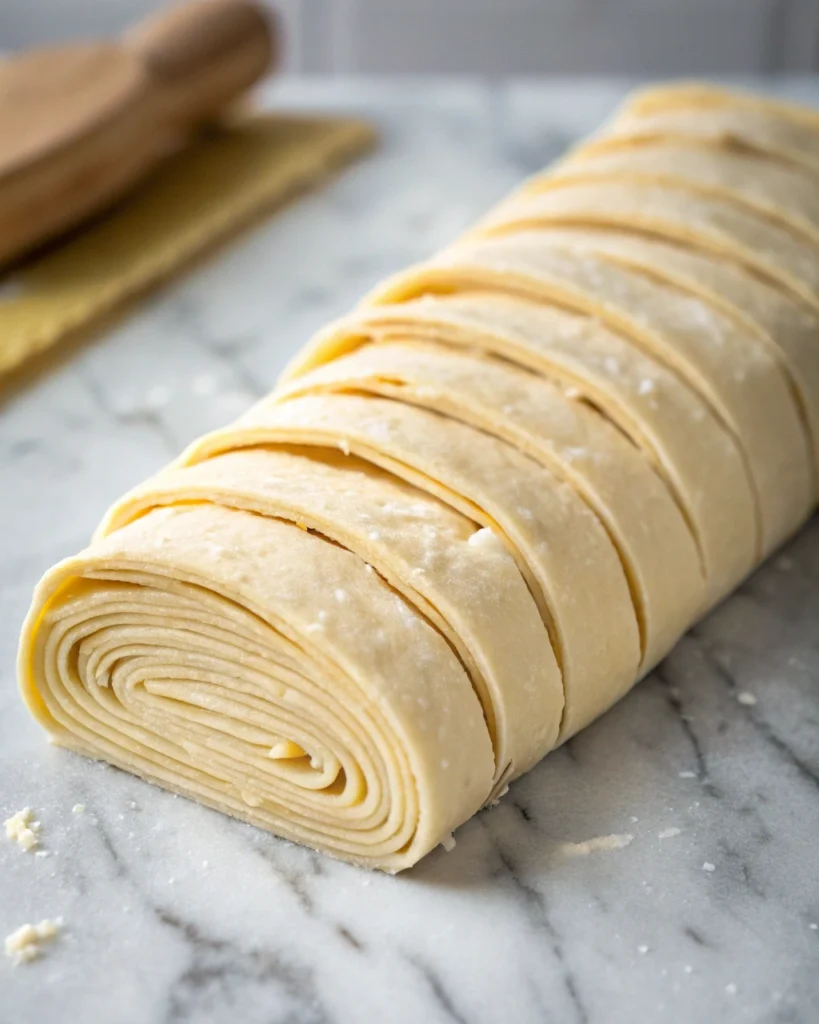
Let’s cut to the chase — lamination is where the magic happens in a Perfect Danish Pastry Recipe. It’s the method of folding butter into dough to create layers upon layers of pastry goodness. When baked, these layers puff up beautifully, giving you that signature flake and crunch.
You start by rolling the chilled dough into a rectangle and placing a cold block of butter in the center. Fold the dough around the butter like an envelope, sealing it tight. Then roll and fold, rotate and repeat. After three folds, you’ll have 27 delicate layers — and yes, you’ll taste every one of them.
But here’s the kicker: if your butter melts or breaks into pieces, the whole structure collapses. So, always work cold, chill often, and be patient. Don’t rush the rest periods between folds — they prevent tearing and butter seepage.
For more creative inspiration on using laminated dough in desserts, be sure to visit our puff pastry dessert recipes page.
How to Incorporate Butter Without Melting or Breaking
Here’s the tricky part: butter needs to be cold, but not rock hard. If it’s too soft, it’ll ooze out. If it’s too stiff, it’ll crack and ruin the layers. Aim for butter that’s pliable — think modeling clay consistency.
Roll it between two sheets of parchment paper to form a flat square, then chill for 10–15 minutes before enclosing it in dough.
Once it’s sealed in, roll gently. Use light, even pressure and avoid pressing down too hard. And always chill between folds. If the dough starts to resist or shrink back, pop it back in the fridge for 20 minutes and try again.
Remember, great lamination can take hours — but it’s worth every second if you want that show-stopping Perfect Danish Pastry Recipe result.
Shaping and Filling Your Danish Pastry
Popular Shapes: Spandauer, Snails, Braids, and Twists
Now comes the fun part — shaping! Danish pastries are known for their wide variety of forms. And the good news? You don’t need to be an artist to make them look great.
Let’s start with the basics. Spandauer is the classic round shape with a custard or jam center. Then there are cinnamon snails (kanelsnegle), which are tightly coiled spirals, perfect for that sweet swirl effect.
Feeling bold? Try making twisted braids or folded envelopes for something more intricate. Always roll your dough evenly to about ¼ inch thick, cut cleanly with a sharp knife or pizza cutter, and handle gently to avoid compressing those precious layers.
Each shape adds personality and helps contain different fillings, so let your creativity run wild.
Creative Fillings: Custard, Fruit, Chocolate – Without Overpowering the Dough
Sure, the dough is the star, but the right filling takes your Perfect Danish Pastry Recipe to the next level.
Classic fillings include pastry cream, fruit jams (like raspberry or apricot), and almond paste. For a richer treat, go for chocolate or spiced nuts. Whatever you use, make sure it’s not too runny or it’ll leak during baking.
Don’t overfill either — just a tablespoon in the center does the trick. Remember, your goal is balance. You want the buttery pastry to shine while the filling complements without stealing the spotlight.
Still hungry? For more delicious recipes like these, check out our latest dessert creations on the site — they pair perfectly with a morning coffee or afternoon tea.
Proofing and Baking for a Perfect Result
How to Know When the Pastries Are Fully Proofed
So, you’ve shaped your pastries and they look gorgeous. But now comes a crucial step that many overlook — proofing. Skipping this or cutting corners here can ruin even the most carefully laminated dough.
For the Perfect Danish Pastry Recipe, proofing allows the yeast to do its job and gives your pastry that light, airy texture. But how do you know when it’s just right?
First, give your pastries time. At room temperature, they can take anywhere from 2 to 4 hours depending on humidity. Look for visual cues: the dough should puff up noticeably and feel jiggly when gently tapped. It should not spring back quickly — that means it still needs time.
Another good tip? Look for a slight wobble in the center and a smooth, expanded surface. Under-proofed dough bakes dense, while over-proofed ones collapse. So yes, patience really is a virtue here.
Optimal Oven Temperature and Time
Now it’s go time — let’s bake. For most Danish pastries, a hot oven is key. Preheat to 375°F (190°C) and make sure it’s fully heated before anything goes in. Cold ovens make sad pastries.
Before baking, brush the tops lightly with an egg wash. This helps give that shiny, golden finish that screams “fresh from the bakery.”
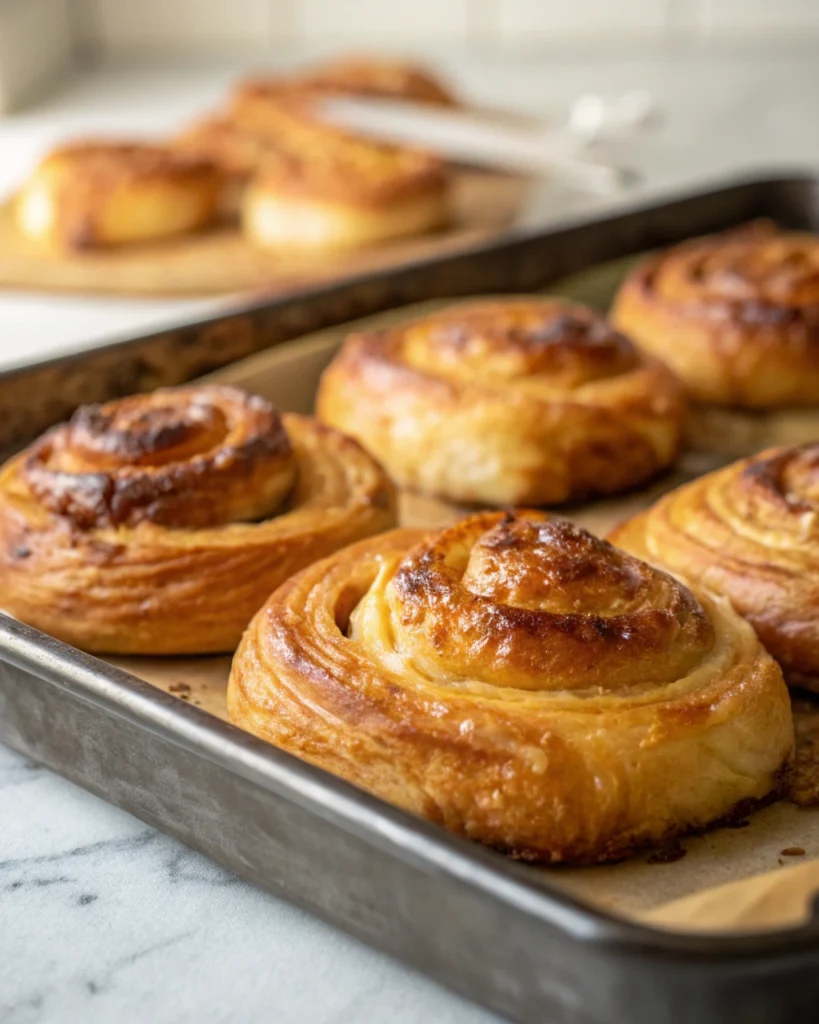
Bake your pastries on the middle rack for about 15–20 minutes, or until they’re golden brown and the layers are visibly separated. Watch closely in the final minutes — every oven is different.
Once baked, cool them on a wire rack. Don’t leave them on the pan too long or the bottoms might go soggy. With the right timing, you’ll get crisp edges, a tender center, and that irresistible butter aroma — all hallmarks of the Perfect Danish Pastry Recipe.
Common Variations and Regional Styles of Danish Pastry
Scandinavian Favorites: Tebirkes, Frøsnapper, Wienerbrødsstang
While the base recipe stays the same, Danish pastries come in many delicious variations across Scandinavia. And honestly, exploring these styles might just be the best part.
Tebirkes, for example, are long, filled pastries topped with poppy seeds — they’re often filled with almond paste or a buttery remonce. Then there’s Frøsnapper, a twisted pastry loaded with sugar and seeds, often shaped like a spiral ribbon.
Wienerbrødsstang is another showstopper — it’s a long, filled pastry log often cut into slices, perfect for sharing with guests. All these are amazing extensions of the Perfect Danish Pastry Recipe, showcasing the versatility of the dough.
Modern Twists on the Classic Danish Pastry Recipe
In today’s kitchens, bakers are getting creative with fillings and shapes. From matcha cream to blueberry lemon curd or chocolate hazelnut spread, the flavor possibilities are endless.
You might also see heart-shaped pastries, braided twists, or savory versions filled with cheese and herbs. While purists might scoff, these innovations keep the tradition alive and exciting.
No matter how you shape or flavor it, the core remains the same: a buttery, layered, yeasted dough that defines a Perfect Danish Pastry Recipe — rich in taste, texture, and tradition.
Storing, Freezing, and Reheating Danish Pastries
How to Keep Danish Pastries Flaky After Baking
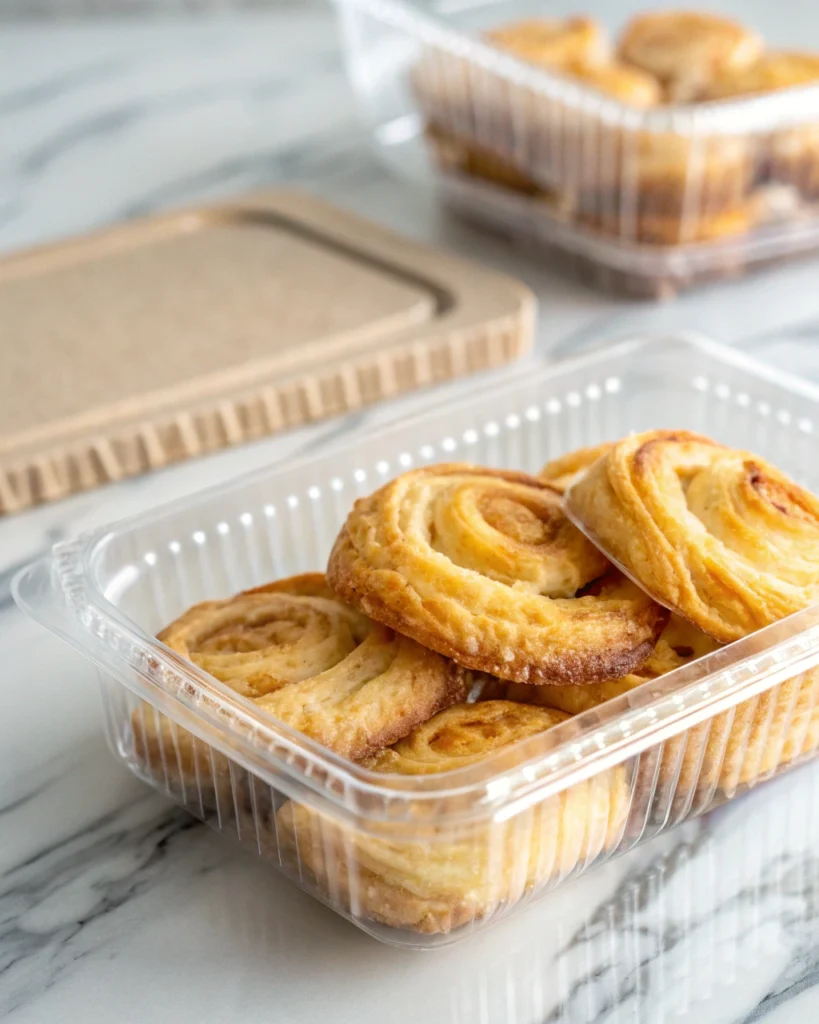
Once you’ve baked your pastries to golden perfection, the next challenge is keeping them fresh and flaky. Nobody wants a soggy or stale pastry the next day!
To maintain the magic of your Perfect Danish Pastry Recipe, store any leftovers in an airtight container at room temperature for up to two days. Place a sheet of parchment between layers to avoid them sticking together.
If you’d like to enjoy them beyond that, don’t worry — they freeze beautifully. Just make sure the pastries are fully cooled before wrapping them tightly in plastic wrap and storing in a freezer-safe bag. This helps protect those delicate layers.
When you’re ready to eat them again, pop them in a preheated oven at 325°F (165°C) for about 8–10 minutes. Skip the microwave — it ruins the crispness. Trust us, those extra minutes in the oven are worth every second.
Can You Freeze Danish Pastry Dough? Best Practices
Absolutely! One of the best things about making a Perfect Danish Pastry Recipe is how well the dough holds up in the freezer. If you’ve gone through all the effort of lamination, why not save some for later?
After the final fold, wrap the dough tightly in plastic and place it in a freezer-safe bag. It’ll stay good for up to a month. When you’re ready to use it, thaw overnight in the fridge. Let it sit at room temperature for about 30–60 minutes before rolling it out.
Freezing shaped, unbaked pastries also works great. Just place them on a tray to freeze individually, then store in a bag or container. When you’re ready, let them proof and bake as usual. It’s a real time-saver!
FAQs
What is the secret to making good pastry?
What’s the difference between puff pastry and Danish pastry?
What makes Danish pastry different from others?
What is the best Danish pastry?
What is the golden rule of pastry making?
What is the most difficult pastry to make?
Conclusion
Recap of Tips for a Flawless Danish Pastry
You’ve made it to the end — and hopefully, you’re more excited than ever to try your hand at the Perfect Danish Pastry Recipe. From choosing the right ingredients to mastering lamination and shaping your pastries with care, each step brings you closer to that irresistible bite.
Let’s quickly recap: always use high-quality butter, keep everything cold, and give your dough the time it needs to rest and rise. Don’t skip the proofing stage, and bake at the right temperature to get that golden, flaky finish. Remember, even small details — like how you fold the dough or how long you chill between steps — can make a big difference.
Final Encouragement: Practice, Patience, and Enjoyment
At first, laminated dough might seem intimidating. But trust us — once you see those layers puff up in the oven, you’ll be hooked. And here’s the best part: every time you make it, you’ll get better.
So go ahead, roll up your sleeves and dive into the Perfect Danish Pastry Recipe. Don’t stress over perfection. With a little practice, lots of butter, and some weekend baking time, you’ll be making bakery-worthy pastries in no time.
Most importantly? Have fun with it. Baking is as much about the joy of the process as it is the final result. Happy baking!
Print
Perfect Danish Pastry Recipe
- Total Time: 3 hours 20 minutes
- Yield: 12 pastries
Description
A step-by-step guide to making the perfect Danish pastry at home — buttery, flaky layers with endless filling possibilities.
Ingredients
– 2 1/4 teaspoons (1 packet) active dry yeast
– 1/4 cup warm water (110°F / 45°C)
– 3/4 cup whole milk, lukewarm
– 1/4 cup granulated sugar
– 1/2 teaspoon salt
– 1 large egg
– 2 1/2 cups all-purpose flour (plus extra for rolling)
– 1 cup (225g) unsalted European-style butter, cold
– 1 egg (for egg wash)
– Optional fillings: custard, jam, almond paste, or chocolate
– Optional toppings: powdered sugar, chopped nuts, or seeds
Instructions
1. In a bowl, mix yeast with warm water and a pinch of sugar. Let sit for 5–10 minutes until foamy.
2. Add warm milk, sugar, salt, and egg. Mix well. Gradually add flour to form a soft dough.
3. Knead for 5–7 minutes until smooth. Cover and refrigerate for at least 1 hour or overnight.
4. Prepare butter by shaping into a flat square between parchment paper. Chill.
5. Roll out chilled dough, place butter in the center, fold like an envelope, and seal edges.
6. Perform three letter folds, chilling for 30 minutes between each fold.
7. After final fold, chill dough for 1 hour, then roll out and shape as desired.
8. Add filling (if using), proof pastries at room temp until doubled in size (2–4 hours).
9. Brush with egg wash. Bake at 375°F (190°C) for 15–20 minutes until golden and puffed.
10. Cool on a wire rack. Enjoy warm or at room temperature.
- Prep Time: 3 hours (including resting and proofing)
- Cook Time: 20 minutes
- Category: Pastry
- Cuisine: Scandinavian, European
Nutrition
- Calories: 290 kcal per pastry (estimate)
- Protein: 5g per pastry (estimate)
Keywords: Perfect Danish Pastry Recipe, Danish pastry, laminated dough, homemade Danish pastry, yeast pastry, spandauer